Subscribe to our newsletter
Thank you! Your submission has been received!
Oops! Something went wrong while submitting the form.


Kubernetes scheduling is an important function that tells where and how pods are deployed within a cluster. Though the process sounds straightforward—simply assigning pods to nodes—the actual mechanics are complex, involving several decision-making phases and components to ensure balanced, and resilient workload distribution.
In this guide, we’ll break down how Kubernetes scheduling works, how it determines the right nodes for pods, and the factors that influence scheduling decisions.
When you create a workload in Kubernetes, such as a deployment, the API server receives the request and saves it in etcd, a highly available key-value store that backs Kubernetes cluster state. However, it's not the scheduler that creates pods. The controller manager is responsible for creating pods, along with ReplicaSets and other resources needed to run the deployment. These new pods are initially set to "Pending" and added to a scheduling queue.
From here, the kube-scheduler, the default Kubernetes scheduling component, takes over to assign each pending pod to an available node that meets the pod’s requirements.
Let’s break this down with an example:
Create a Deployment:
The API server receives the deployment request. It stores the deployment specification in etcd. The replicaset controller creates a replicaset and then the Pod controller creates the pods and places them in a Pending state in the scheduling queue.
Then kube-scheduler reviews the pending pods one by one. For each pod, it checks the available nodes in the cluster to find one that satisfies the pod’s requirements (like requested CPU, memory, or node labels). Once the pod is assigned to a node, it transitions from Pending to Running after the kubelet successfully starts at least one of its primary containers. The kubelet on the node pulls the container image (e.g., nginx), starts the container, and manages the pod lifecycle.
>> Take a look at Guide to Kubernetes Health Checks
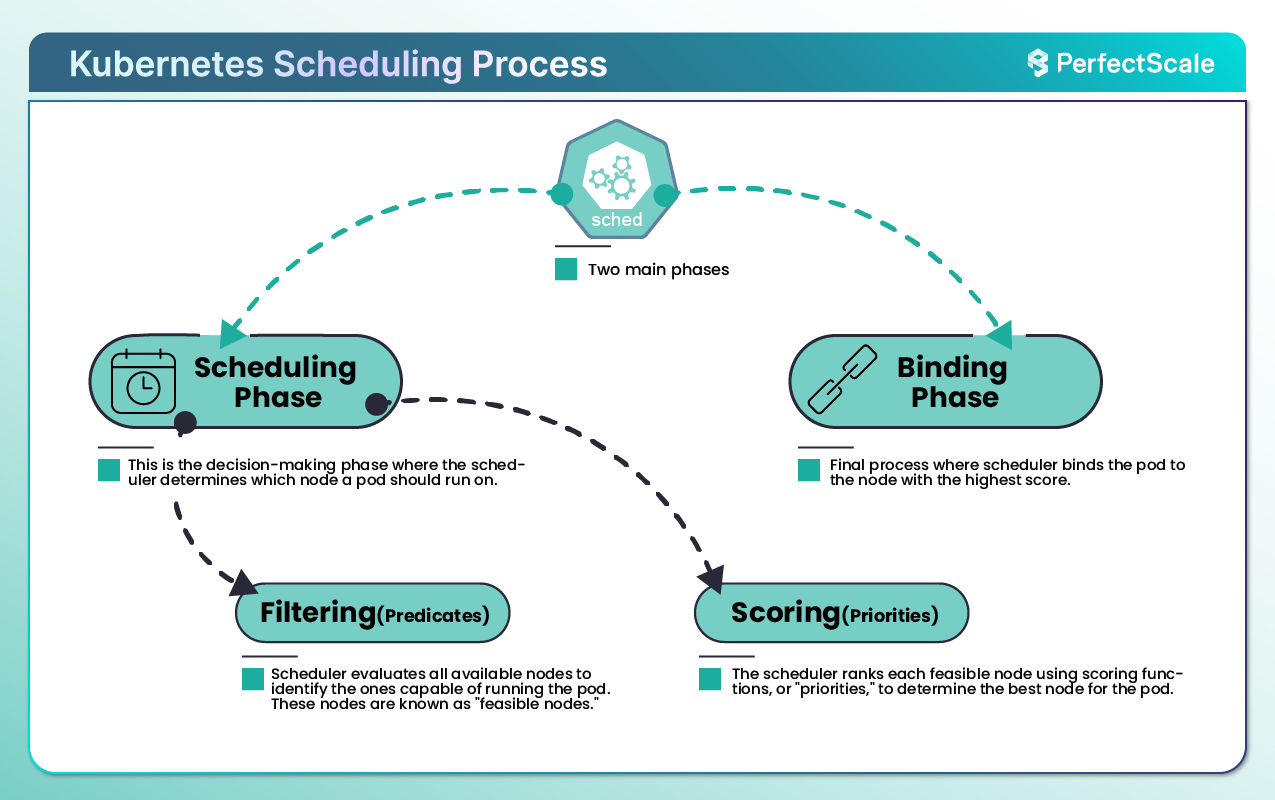
Kubernetes scheduling has two main phases:
1. Scheduling Phase: This is the decision-making phase where the scheduler determines which node a pod should run on. Each pod is scheduled one at a time, with the scheduler selecting nodes based on filtering and scoring criteria.
Let’s understand the scheduling phase in detail:
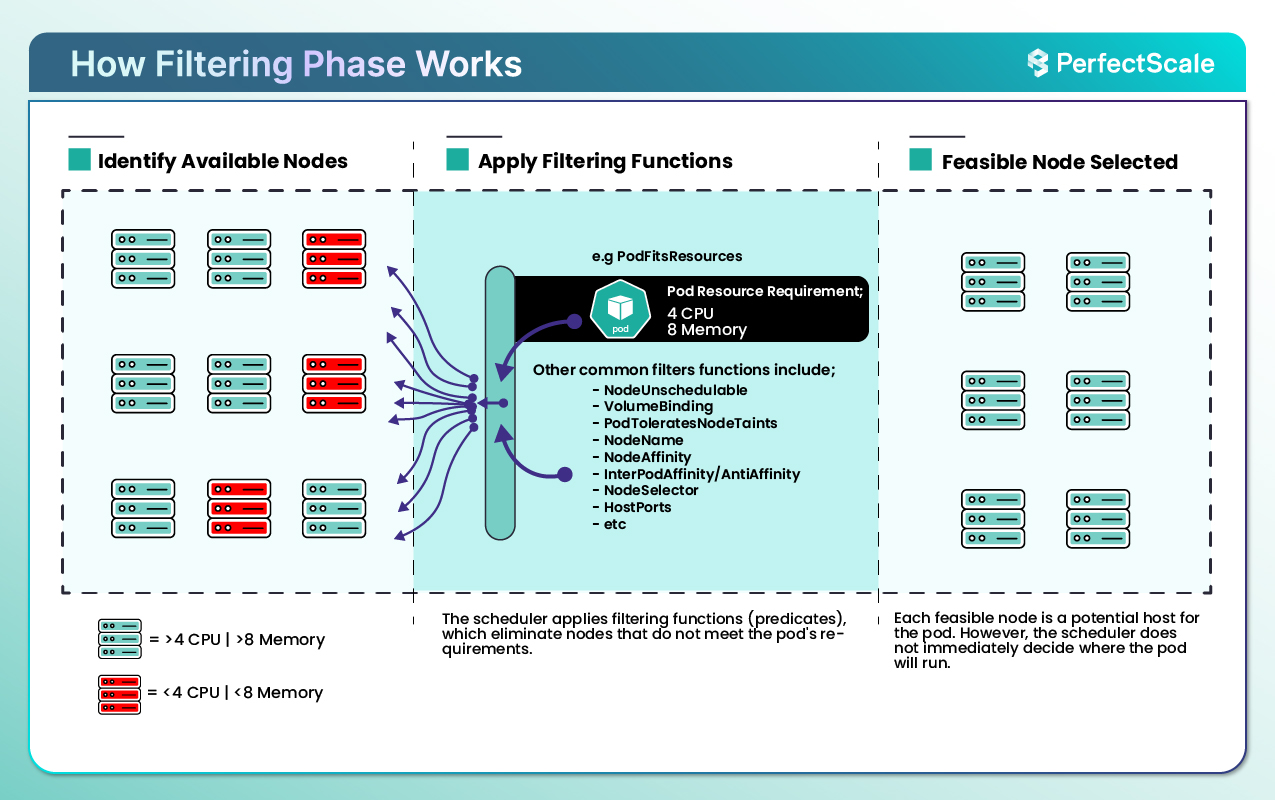
The first part of the scheduling process is filtering, where the scheduler evaluates all available nodes to identify the ones capable of running the pod. These nodes are known as "feasible nodes." This process uses functions, or "predicates," that rule out nodes unable to meet the pod's basic requirements.
For example, let’s say a pod requests 4 CPUs and 8 GB of memory. Nodes lacking these resources are automatically filtered out.
There are common filters that help us in the filtering process:
The filtering phase has 13 default predicates that collectively ensure only the most compatible nodes are selected for further evaluation.
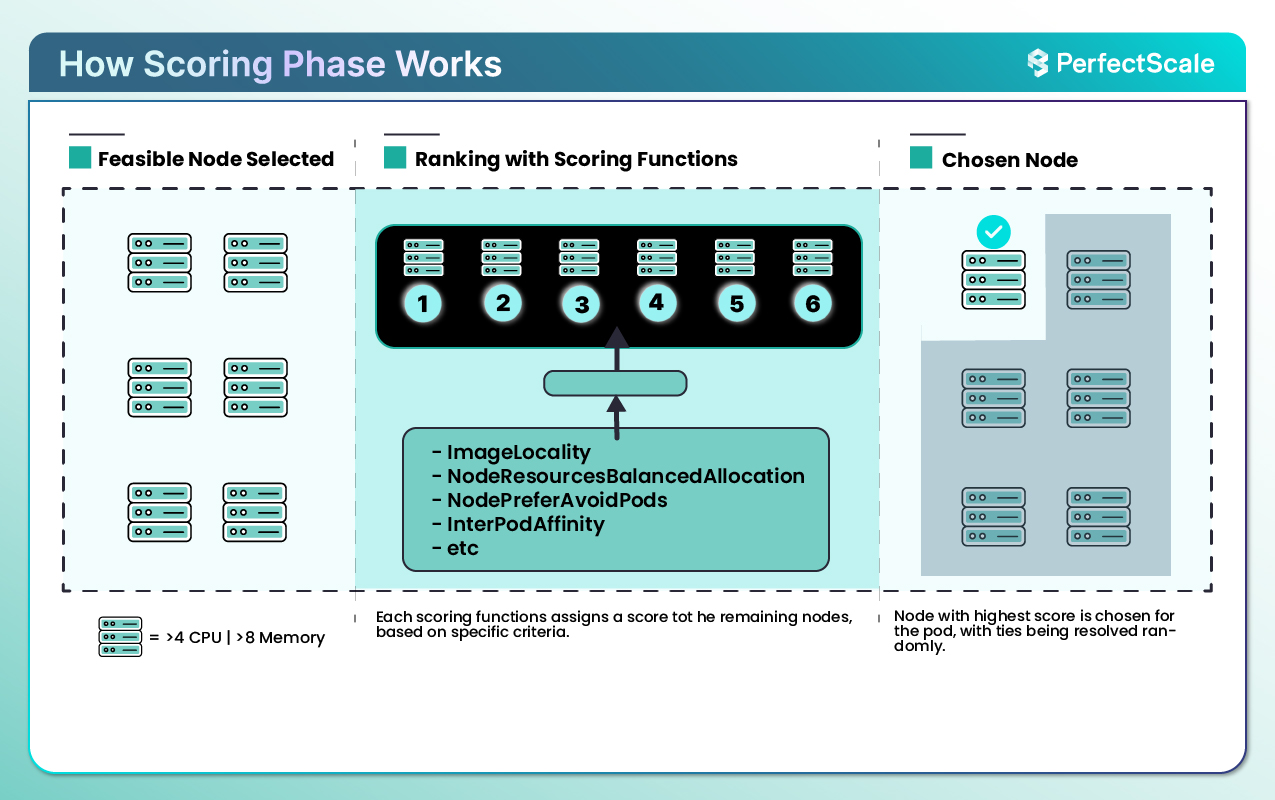
Once the scheduler has a list of appropriate nodes, it enters the scoring/ranking phase. The scheduler ranks each compatible node using scoring functions, or "priorities," to determine the best node for the pod.
Each scoring function assigns a score to the remaining nodes, based on specific criteria. The node with the highest score is chosen for the pod.
There are common scoring functions that help us in the scoring process:
Kubernetes has 13 default scoring functions that help the scheduler make perfect choices. By evaluating each node against these priorities, the scheduler ensures the best node for the pod.
2. Binding Phase: After scoring, the scheduler binds the pod to the node with the highest score. This binding information is updated in etcd, signaling to the API server and the Kubernetes system that the pod is now scheduled on a specific node. The binding process finalizes the scheduling decision, and the pod is set up on the selected node, ready to be initialized by the kubelet on that node.
This is the default behaviour of Kubernetes scheduling but we can even change this default behaviour. We can use different methods to influence scheduling. Let’s discuss the different methods:
nodeSelector is a simple yet effective way to control which nodes can run a pod. By adding labels to nodes (e.g., gpu: true) and setting a nodeSelector in the pod specification, you can restrict the pod to nodes that match the label criteria. This is used to direct workloads to nodes with specialized hardware or specific characteristics.
If no nodes match the label, the pod will remain in a Pending state.
Node affinity is a more flexible approach than nodeSelector, allowing you to define both hard (required) and soft (preferred) constraints on where a pod should be scheduled. For example, you might prefer placing a pod on nodes within a certain availability zone but allow it to run elsewhere if no nodes in that zone are available.
Here, the pod is required to be placed on nodes in the us-east-1 zone and prefers high-memory instance types.
Pod affinity and anti-affinity allow you to control pod placement based on the proximity to other specific pods. For example, you might want pods in a web application’s frontend to be close to backend services for reduced latency, or you might want replicas of a service to avoid sharing nodes to improve resilience.
Pod anti-affinity is often used to spread pods across nodes to prevent multiple instances of the same workload from being on the same node.
Taints and tolerations work in tandem to keep specific workloads off nodes or to allow only certain pods onto tainted nodes. Taints are added to nodes to repel certain pods, while tolerations allow designated pods to be scheduled on those nodes despite the taints.
For example, nodes dedicated to GPU workloads might have a gpu-dedicated: true taint, and only GPU pods with a matching toleration can be scheduled on them.
Example:
>> Take a look at Guide to Taints and Tolerations in Kubernetes
Topology spread constraints help distribute pods across different nodes, zones, or regions, ensuring that workloads are not concentrated on a single node or fault domain. This helps enhance fault tolerance and resilience, especially for critical workloads. By defining topology constraints, you can achieve a balanced distribution of workloads across your cluster.
Example:
For more advanced configurations, Kubernetes allows custom schedulers and configuration tweaks to meet unique scheduling needs. Some of these techniques are:
Preemption allows Kubernetes to prioritize high-priority pods when resources are scarce. If a high-priority pod cannot be scheduled due to resource constraints, Kubernetes identifies and preempts lower-priority pods to free up resources. The preemptionPolicy field in the PriorityClass object can control whether preemption is enabled or disabled.
Example:
>> Take a look at Guide to Preemptible Pods: Optimizing Kubernetes Node Utilization
Quality of Service (QoS) classes are assigned to pods based on their resource requests and limits. Kubernetes uses these classes to determine eviction priorities and scheduling preferences.
There are different QoS Classes:
a. Guaranteed: The Pods with equal requests and limits for all containers. It is least likely to be evicted.
b. Burstable: The Pods with requests lower than limits. It is a moderate eviction priority.
c. BestEffort: The Pods without specified requests or limits. It is most likely to be evicted.
Example:
By differentiating workloads based on their QoS class, Kubernetes optimizes node utilization and ensures critical workloads remain stable even during resource pressure.
In Kubernetes, the default scheduler (kube-scheduler) assigns pods to nodes based on predefined policies. You can run custom schedulers alongside the default kube-scheduler to handle specific workloads or teams.
This is how you can implement the custom scheduler:
a. Develop the Scheduler: You can create a scheduler that interfaces with the Kubernetes API to watch for unscheduled pods and assign them to appropriate nodes based on custom logic. This involves writing a controller that handles the scheduling decisions.
b. Deploy the Scheduler: Then run the custom scheduler as a separate deployment within the cluster, ensuring it has the necessary permissions to interact with the Kubernetes API.
c. Assign Pods to the Scheduler: Then specify the custom scheduler for particular pods by setting the schedulerName field in the pod specification.
Example:
By assigning my-custom-scheduler as the schedulerName, this pod will be scheduled by the custom scheduler instead of the default kube-scheduler.
Topology management policies ensure that pods are scheduled onto nodes in a manner that optimizes hardware resource utilization, considering factors like CPU and memory locality. The Topology Manager component is the one in the kubelet that coordinates these optimizations.
These are available policies:
a. None: It means that no topology alignment is performed.
b. Best Effort: It attempts to align resources for optimal topology but does not guarantee it.
c. Restricted: It enforces strict alignment of resources, rejecting pod scheduling if alignment is not possible.
d. Single NUMA Node: It ensures that all resources for a pod are allocated from a single NUMA(Non-Uniform Memory Access) node, optimizing performance for latency-sensitive applications.
You can set the desired policy in the kubelet configuration on each node.
Example:
This configuration directs the Topology Manager to allocate all resources for a pod from a single NUMA node.
Kubernetes' scheduling capabilities are excellent, yet it has limitations and challenges:
1. Resource Allocation Conflicts: The scheduler relies on resource requests and limits defined in the pod specification. If these values are misconfigured or missing, it can result in pods over-consuming node resources or being scheduled on insufficiently capable nodes.
2. Complexity of Advanced Features: The configurations like node affinity, taints, tolerations, and topology spread constraints give users fine-grained control but are often complex to implement correctly. Misconfigurations can lead to pods being unscheduled or misaligned with desired infrastructure.
3. Handling Unready or Unschedulable Pods: The scheduler does not inherently differentiate between pods that are unready for scheduling (e.g., waiting for resources or dependencies) and those that are unschedulable due to missing requirements. This can cause inefficiencies as it retries scheduling repeatedly.
4. Scalability Concerns: In large clusters, with thousands of nodes and pods, the default scheduler may struggle to keep up with the load causing delays in pod scheduling or performance bottlenecks.
5. Preemption Challenges: While preemption allows higher-priority pods to evict lower-priority ones, it can disrupt running workloads and is not always deterministic in resolving resource contention. This can lead to instability in critical environments.
6. Single-Scheduler Model: Kubernetes clusters typically rely on a single scheduler instance, which can become a bottleneck. The custom schedulers or scaling techniques like multiple scheduler instances can help, but they require additional expertise to implement and manage.
Kubernetes scheduling is a process designed to optimize resource utilization, workload performance, and fault tolerance. Whether you're working with default behaviors or customizing scheduling with advanced techniques, understanding these mechanisms helps you fine-tune cluster performance to meet your unique needs.
Ready to elevate your Kubernetes management to the next level? With PerfectScale, you can harness the full potential of Kubernetes resource scheduling while reducing cloud costs and enhancing resilience. Our advanced algorithms optimize resource usage across your clusters, ensuring workloads are perfectly balanced and scaling is efficient. Join industry leaders like Paramount Pictures and Creditas in transforming Kubernetes operations with PerfectScale by DoiT. Sign up or Book a demo today to unlock the future of automated Kubernetes optimization and management.


Install in minutes and instantly receive actionable intelligence.