Subscribe to our newsletter
Thank you! Your submission has been received!
Oops! Something went wrong while submitting the form.


ARM (Advanced RISC Machine) instances are virtual machines powered by processors designed on the ARM architecture. It's great for general computing, scalable web applications and can be also used for compute-intensive tasks such as AI/ML or media processing. ARM instances are available on major cloud platforms, including AWS Graviton, Google Cloud, Oracle Cloud Ampere A1, and others.
In this article, you’ll learn about using ARM instances in Kubernetes. You’ll see the benefits, how to set up a ARM based cluster, and how to build and deploy ARM-compatible applications in Kubernetes and then specifically on AWS.
There are several reasons to use ARM instances. These are:
1. ARM processors consume less power making them ideal for cloud-native applications with significant computing needs.
2. Due to their design, ARM processors are cheaper than x86-based instances to produce, resulting in lower costs for cloud users.
In this section, you’ll see a general guide on how to use ARM-based instances in Kubernetes. This is designed to give you a foundational understanding that can be applied across different environments and cloud providers. In the next section, you’ll take a look specifically at using ARM instances on AWS.
Let’s start:
Step 1: Setting Up a ARM-Based Kubernetes Cluster
A Kubernetes cluster using ARM instances consists of nodes running on ARM64 architecture. You can set up a ARM-based Kubernetes cluster via Kubeadm(manual setup) and use the Managed Kubernetes Service (AWS EKS, Google GKE, Oracle OKE, Azure AKS).
>> Take a look at 9 Ways to Spin Up an EKS Cluster
Step 2: Building ARM-Compatible Applications
To run applications on ARM nodes, your container images must support the ARM64 architecture. This is how you can build and push ARM-compatible image:
a. Enable Buildx:
Docker Buildx is a tool that simplifies building images for different architectures.
b. Build and push an ARM64 image:
You can replace registry, image-name, and tag with your container registry, image name, and desired tag, respectively.
c. Inspect the image
Before deploying, verify the image supports ARM64:
You should get a similar output like this, which contains the arm64 field:
Step 3: Deploying Workloads on ARM Nodes
Once your cluster is ready and your images support ARM64, you can deploy workloads to ARM nodes.
You can use Node Selectors and Affinity for ARM Scheduling, for example:
Now that you’ve seen the general steps to set up and use ARM instances in Kubernetes, let’s explore ARM instances specifically on AWS.

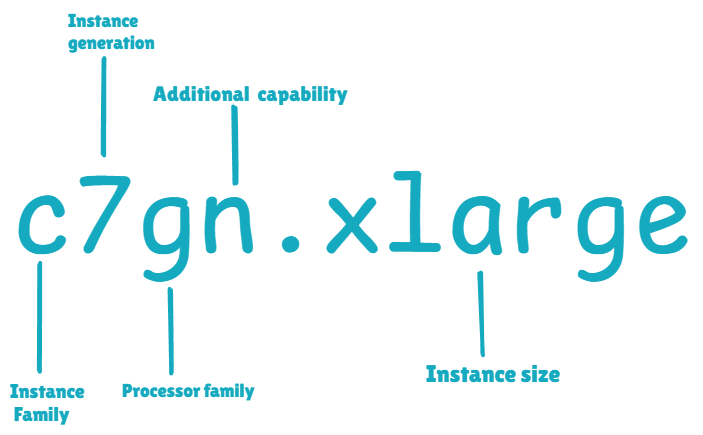
ARM instances, powered by AWS Graviton processors, are an excellent choice for running cost-efficient and high-performance workloads on AWS. AWS Graviton processors are custom-built based on ARM architecture. There are different types of AWS Graviton-based EC2 instances like M7g, T4g, C7g, R7g, etc
Step 1: Setting Up an ARM-Based EKS Cluster
You’ll now create an EKS cluster with Graviton-powered instances using eksctl, a CLI tool for managing Kubernetes on AWS.
Make sure you have AWS CLI, eksctl, and kubectl installed.
Run the following command to create a cluster with a default node group:
The --name is your name of the cluster, - -node-type is the instance type (Graviton-powered m6g.medium in this case), --nodes-min and --nodes-max defines the minimum and maximum number of nodes for scaling.
This process may take a few minutes. Once completed, verify your cluster:
You should get a similar output:
To confirm the CPU architecture of your nodes:
Now, you're sure that your nodes run with the arm64 architecture.
Step 2: Building ARM-Compatible Docker Images
Now, you’ve already seen how you can build ARM-compatible images. So, you should follow the above section to make your own.
Step 3: Configuring Graviton-Powered Node Groups
If you already have an EKS cluster and want to add Graviton nodes, you can use eksctl to create a new node group:
Step 4: Deploying Workloads to Graviton Nodes
Now, you can schedule specific workloads on ARM nodes, and use node affinity in your pod specification:
This example uses nginx:stable image which supports amd64 and arm64.
Apply it:
Now, your workload runs only on Graviton nodes.
Check the pods' status:
Confirm that your node is ARM-based:
The pods should be running on ARM-based nodes, as specified in the affinity rules.
Step 5: Clean Up
Delete the resources after testing:
Instructure, the company behind the Canvas Learning Management System, used AWS Graviton-based instances to improve performance and reduce costs. By migrating their workloads to Graviton, they achieved a remarkable 30% increase in performance, ensuring faster processing for their education platform's resource-intensive operations. This improvement not only enhanced user experience for millions of educators and students worldwide but also contributed to better resource utilization and cost savings. You can read the full post here.
Pinterest, a global visual discovery engine, integrated AWS Graviton-based instances into its Kubernetes clusters to power critical workloads. The results were transformative, with the company achieving 38% savings on compute resources and reducing carbon emissions by 62% for their workloads. This demonstrates how ARM instances can align with both business goals of cost-efficiency and environmental sustainability. You can read the full post here.
Zendesk, a leading customer service software provider, opted for AWS Graviton-based instances to optimize its Kubernetes deployments. The migration led to a 30% improvement in performance and a 42% reduction in costs. For Zendesk, this meant a dual benefit of enhancing their platform’s responsiveness while significantly lowering operational expenses. You can read the full post here.

1. Test your workloads for ARM compatibility, as K8s relies on container images, and these images must support ARM architecture. Use tools like Docker Buildx that simplify creating multi-architecture container images.
2. Testing your applications and their dependencies on a development cluster is important before deploying them in production. It helps identify any compatibility issues early on.
3. You should monitor and observe your ARM-based workloads effectively. You can use tools like Prometheus and Grafana that provide invaluable insights by collecting and visualizing metrics from your ARM nodes. With proper alerting, you can proactively address issues related to CPU, memory, and network utilization. You can even use solutions like Amazon CloudWatch which is a great choice when using managed Kubernetes services.
4. ARM nodes can have different performance characteristics than x86 nodes, which requires careful configuration of K8s resources. For proper scheduling, you can use node affinity and Taint and Tolerations rules; to direct ARM-compatible workloads to ARM nodes.
ARM-based instances in Kubernetes are good for cost savings and performance optimization. They use less power, cost less than x86 alternatives, and are well-suited for modern cloud workloads.
If you're looking to cut cloud costs, improve energy efficiency, or simply experiment with new architectures, now is the perfect time to explore ARM instances in Kubernetes. Try deploying your workloads on ARM nodes and see the benefits for yourself!
And if you’re serious about Kubernetes cost optimization - give PerfectScale a try. Connect your clusters free of charge, easily discover wasted resources and get pod right-sizing recommendations that will allow you to slash Kubernetes costs.


Install in minutes and instantly receive actionable intelligence.


.png)

.png)
