Subscribe to our newsletter
Thank you! Your submission has been received!
Oops! Something went wrong while submitting the form.


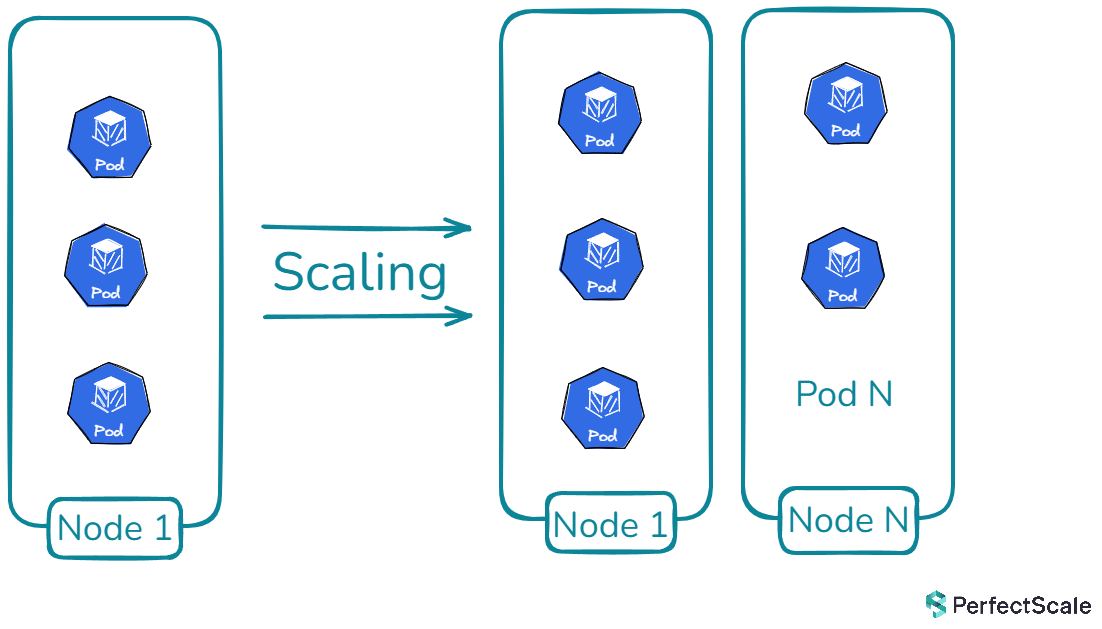
Kubernetes Cluster Autoscaler (CA) adjusts the number of nodes in the cluster based on pod scheduling failures or when nodes are underutilized.
While CA operates at the node level, HPA and VPA manage scaling at the pod level. If you are interested in learning more about different methods of autoscaling, please take a look at:
Horizontal Pod Autoscaler (HPA): This scales the number of application replicas.
Vertical Pod Autoscaler (VPA): This adjusts the resource requests and limits for a container.
In this article, we’ll discuss the Kubernetes Cluster Autoscaler, how CA works, implementation of CA in EKS, troubleshooting, its helm chart deployment, and differences with other tools.
Kubernetes Cluster Autoscaler is a powerful tool in the Kubernetes ecosystem that automatically adjusts the size of a Kubernetes cluster based on the current workload demands. It's designed to ensure that your cluster always has the right amount of compute resources to run all of your applications efficiently, without wasting resources or leaving pods unscheduled due to insufficient capacity.
The primary goal of Kubernetes Cluster Autoscaler is to maintain a balance between resource utilization and availability. It achieves this by adding nodes when there are pods that can't be scheduled due to insufficient resources, and removing nodes when they're underutilized and their pods can be safely rescheduled elsewhere in the cluster.
Kubernetes Autoscaler operates on a straightforward yet effective principle. It continuously monitors the state of the cluster and makes decisions based on the current resource utilization and pod scheduling status. Here's a breakdown of its operation:
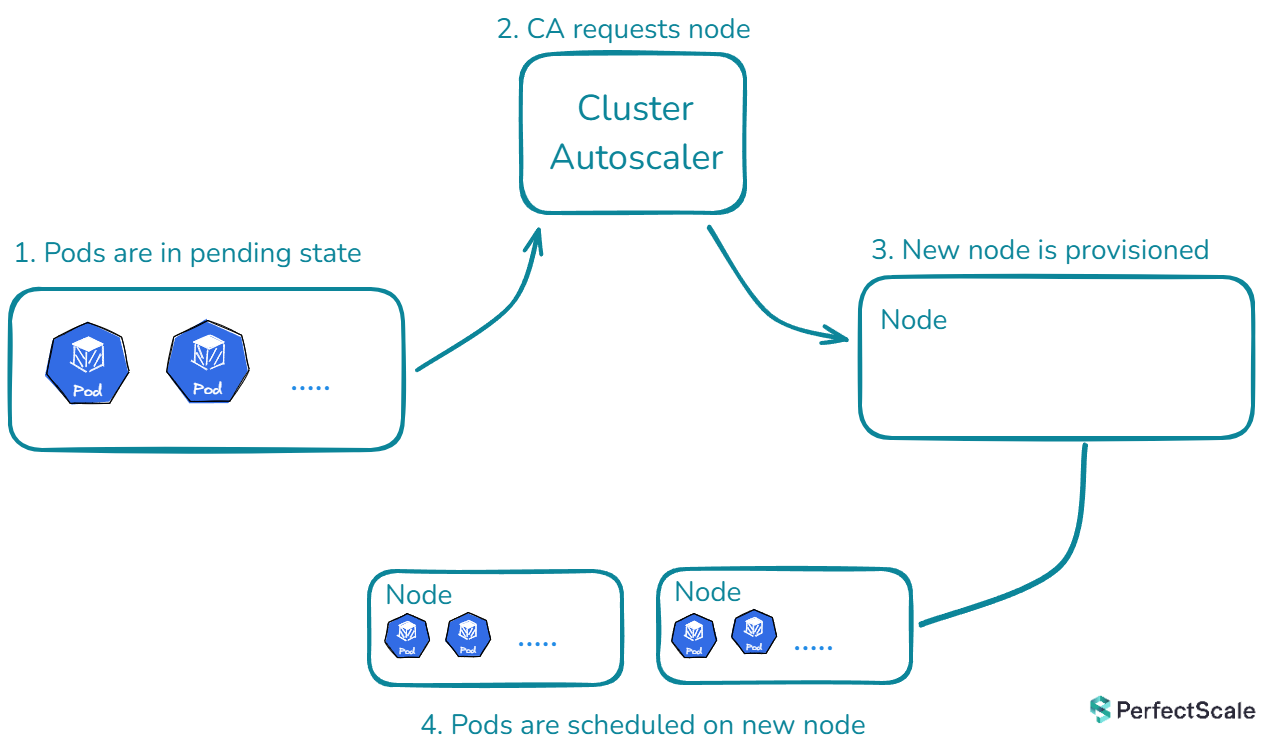
When a pod is unschedulable due to insufficient resources, Kubernetes Cluster Autoscaler springs into action. It analyzes the pod's resource requirements and the available node pools. If it finds a node pool that can accommodate the pod, it triggers the cloud provider's API to add one or more nodes to that pool. This process continues until all pods are schedulable or the maximum number of nodes is reached.
Cluster Autoscaler regularly checks for underutilized nodes. A node is considered underutilized if its resource utilization falls below a certain threshold (usually 50%) for an extended period (typically 10 minutes). When such a node is identified, K8s Cluster Autoscaler simulates moving all non-critical pods from this node to other nodes. If this simulation succeeds, the node is marked for deletion. The autoscaler then works with the cloud provider to safely remove the node from the cluster.
In clusters with multiple node groups, the Kubernetes Cluster Autoscaler uses sophisticated strategies to maintain balance and optimize resource allocation. This is where expanders come into play. Expanders are pluggable components that determine which node group should be scaled up when there are multiple options available. The Kubernetes Cluster Autoscaler offers various expander types beyond the default "random" option, each providing nuanced scaling decisions. These include the "least-waste" expander for minimizing idle CPU, "most-pods" for maximizing pod scheduling, "price" for cost-effectiveness in cloud environments, and "priority" for custom node group ordering. These options allow for flexible and tailored autoscaling behavior to meet specific cluster needs and constraints.
Cluster Autoscaler respects various constraints set by the cluster administrator. These include minimum and maximum sizes for node groups, pod disruption budgets, and node selectors or taints that might restrict where pods can be scheduled.
Create an EKS cluster with node groups and OIDC provider:
Add tags to the node group's Auto Scaling group as these tags are crucial for the Cluster Autoscaler to identify which Auto Scaling groups it should manage. They enable the auto-discovery feature of the Cluster Autoscaler:
First, get the Auto Scaling group name:
Now, add the required tags:
Verify the tags have been added:
Update your kubeconfig to interact with the cluster:
Create an IAM policy as cluster-autoscaler-policy.json that grants the necessary permissions for CA:
Create the policy:
Create an IAM role and attach the policy:
Create a file named cluster-aosutcaler-deployment.yaml to deploy CA:
Apply the above configuration:

To diagnose and debug issues with the Cluster Autoscaler, follow these steps:
1. Understanding Scale-Down Issues: When troubleshooting Cluster Autoscaler (CA) in Kubernetes, start by examining the basics. Verify if the node group has reached its minimum size, as CA won't scale down beyond this limit. Check nodes for scale-down disabled annotations that might prevent removal. Remember that CA has built-in delays to prevent rapid scaling, so ensure sufficient time has passed since the last scale event. Review CA flags like --scale-down-enabled and --scale-down-delay-after-add, which can significantly impact scaling behavior.
2. Investigating Scale-Up Problems: For scaling up issues, ensure pod resource requests are within the limits of available node types. Check if all suitable node groups have reached their maximum size. In multi-zone clusters with stateful sets, consider using separate node groups per zone to avoid Persistent Volume zone conflicts.
3. Sudden CA Malfunction: When CA stops working unexpectedly, check the cluster-autoscaler status ConfigMap for health information. Investigate any unready nodes, particularly looking for resourceUnready status. Examine /var/log/cluster-autoscaler.log in the control plane(if you have access) for detailed information. For EKS or other environments where you don't have direct access to the control plane, you can access its logs using kubectl
4. Handling Edge Cases: In scenarios where node count is outside expected ranges, consider if nodes were manually added or removed outside of CA control. Use the --enforce-node-group-min-size flag (CA 1.26.0+) to maintain the minimum node group size.
5. Quota Management: When hitting cloud provider quotas, be aware that CA implements a backoff mechanism, attempting scaling periodically with increasing intervals between attempts. Regularly check and adjust your cloud provider quotas to accommodate cluster growth and prevent scaling limitations.
Deploying and managing the Cluster Autoscaler (CA) can be easy using Helm charts. The official K8s Cluster Autoscaler Helm chart, maintained in the Kubernetes autoscaler repository, offers a flexible way to deploy CA in your Kubernetes clusters.
Deploying the K8s Cluster Autoscaler:
To deploy the CA using this Helm chart, you generally follow these steps:
1. Add the autoscaler Helm repository:
2. Update your Helm repositories:
3. Install the chart with custom values:
Depending on your cloud provider (AWS, GCP, Azure), you'll need to set specific values. For example, in AWS, you might need to configure autoDiscovery.clusterName and awsRegion.
Best Practices:
For more information on the helm charts of CA, see here.
This comparison will highlight the key differences and strengths, helping you make an informed decision for your Kubernetes scaling needs.

Karpenter represents a more modern, flexible approach to Kubernetes cluster scaling, offering faster provisioning times and more efficient resource utilization. It's particularly well-suited for dynamic environments with varying workload requirements. Cluster Autoscaler, on the other hand, is a more established solution that works well with predefined node groups and offers broader cloud provider support. It's a reliable choice for more static environments or when working with multiple cloud providers.
See here how to get the most out of Karpenter with smart pod right-sizing.

Cluster Autoscaler and KEDA serve different purposes in the Kubernetes ecosystem. CA focuses on scaling the number of nodes in a cluster based on resource utilization, while KEDA specializes in scaling individual applications based on custom metrics and event-driven triggers. CA operates at the cluster level, adjusting the node count to ensure sufficient resources for all pods. It's tightly integrated with cloud providers and typically takes minutes to scale. On the other hand, KEDA works at the application level, using Custom Resource Definitions to define scaling rules. It's more flexible in terms of metric sources and can scale applications in seconds to minutes. KEDA excels in handling stateful workloads and provides more granular control over scaling individual applications. However, CA is essential for overall cluster management and ensuring the right number of nodes are available to run all workloads efficiently.
Through the implementation steps, troubleshooting techniques, and comparisons with other scaling tools, and limitations, you can effectively use K8s Cluster Autoscaler in your Kubernetes environment. By following these best practices and understanding the nuances of Cluster Autoscaler, you can create a more robust, scalable, and cost-efficient Kubernetes infrastructure.
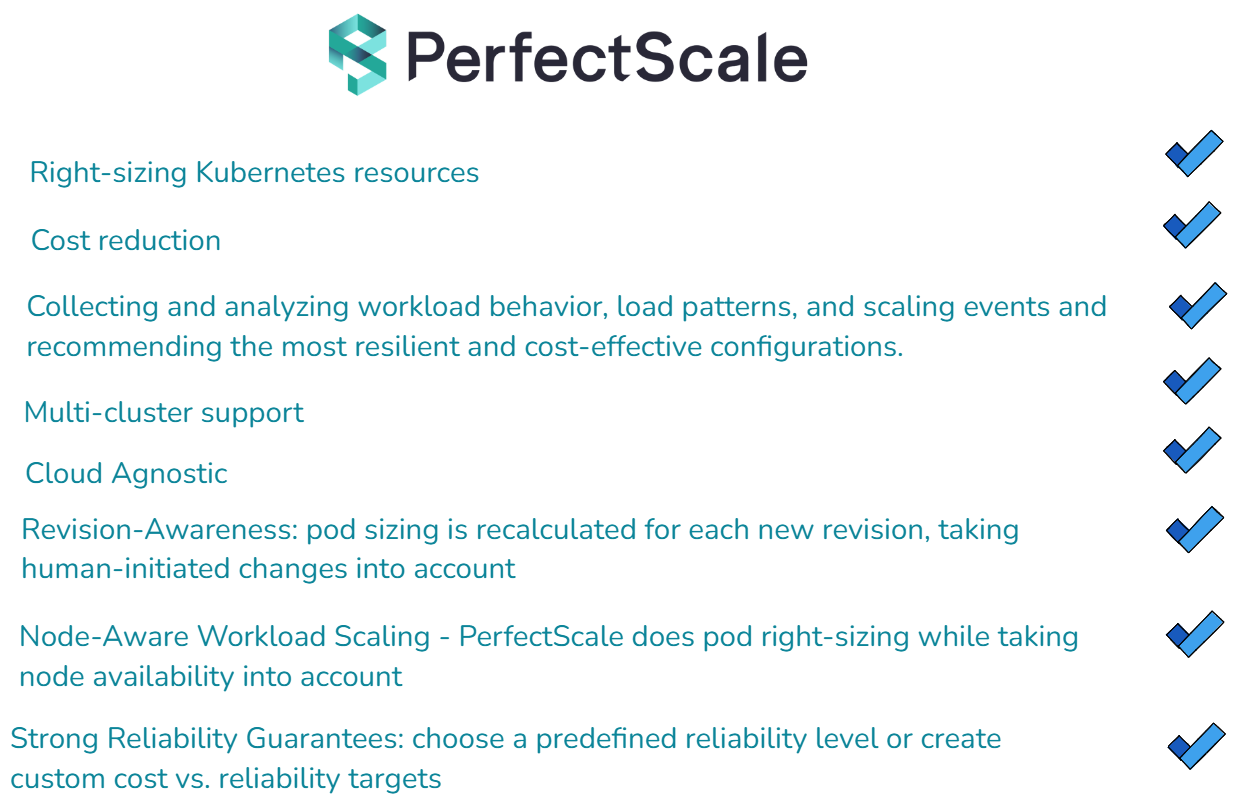
Ready to elevate your Kubernetes management to the next level? With PerfectScale, you can harness the full potential of Kubernetes CA while significantly reducing your cloud costs and enhancing system resilience. Our advanced algorithms and machine learning techniques ensure your services are precisely tuned to meet demand, cutting down on waste and optimizing every layer of your K8s stack. Join industry leaders like Paramount Pictures and Creditas who have already optimized their Kubernetes environments with PerfectScale. Sign up or Book a demo to experience the immediate benefits of automated Kubernetes cost optimization and management, ensuring your environment is always perfectly scalable.
1. Kubernetes Cluster Autoscaler Documentation: https://github.com/kubernetes/autoscaler/tree/master/cluster-autoscaler
2. How Grafana Labs Switched to Karpenter to Reduce Costs and Complexities in Amazon EKS: https://grafana.com/blog/2023/11/09/how-grafana-labs-switched-to-karpenter-to-reduce-costs-and-complexities-in-amazon-eks/


Install in minutes and instantly receive actionable intelligence.


.png)

.png)
